Introduction
This is the first part of a guide to setting up a remote data-science workflow. The goal is to let you start working on a server quickly, using one of the simplest and most battle-tested approaches. We’ll walk all the way from receiving your credentials to launching your first Jupyter Lab session, relying on just a handful of basic commands. The examples assume you use R or Python for data analysis.
The instructions target macOS, Linux, and Windows WSL users. All you need is a standard terminal and an installed OpenSSH client.
Motivation
For many data-intensive tasks—ranging from astronomy to large-scale analytics—a remote server often outperforms a local laptop for several reasons:
Mobility. Сonnect from any device: tablet, laptop, or even a phone..
Performance. Servers often have hundreds of GB of RAM, many CPU cores, powerful GPUs..
Big data. No need to shuffle giant files to your local machine..
Battery life. Heavy computations run on the server, not on your laptop, which is handy on the road.
Long-running jobs. You can launch tasks that run for weeks or months without worrying about shutting your computer down.
Maintenance. The server is looked after by admins (back-ups, updates, security).
SSH access through a proxy
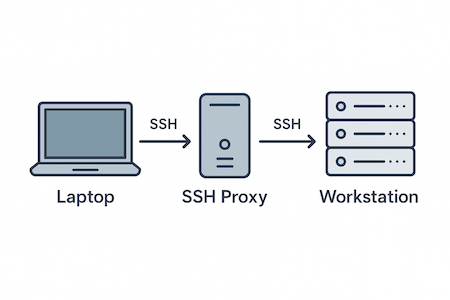
For security reasons your company’s server is probably not reachable directly from the outside. Access is usually arranged either via VPN or a jump/proxy server; here we cover the proxy scenario. Conceptually it looks like this:
First, obtain the login and password for both the proxy and the main server from your sysadmin or IT support. Suppose we have:
- Proxy IP
108.177.126.0 - Main server IP
11.6.3.10 - Username
bob
Connect to the proxy first:
ssh bob@108.177.126.0If that works, you now have a shell on the proxy.
Run hostname to verify you really landed on the host you expect.
From the proxy, log in to the main server:
ssh bob@11.6.3.10You’re now on the main server and can start setting up your environment. To jump back to the proxy, use exit, which closes the current session. Before we configure the toolchain, let’s make logging in more convenient.
Simplified authentication
To avoid typing passwords twice, we’ll set up a ProxyJump and key-based authentication.
Automatic connection via the proxy
On your local machine, open the ~/.ssh/config file in any text editor (create it if it doesn’t exist). Suppose you have several main servers with IP addresses 11.6.3.10, 11.6.3.11, etc., your proxy server is at 108.177.126.0, and your username is bob. Then add the following to this file:
Host 11.6.3.*
    User bob
    ProxyJump 108.177.126.0
Now a simple
ssh 11.6.3.10goes through the proxy automatically—but you still need to enter passwords. Let’s switch to key auth.
Generating an SSH key pair
Generate a key on your laptop:
ssh-keygen -t rsaWe recommend using the more modern Ed25519 algorithm instead of RSA, as it generates shorter keys faster and provides equal or stronger cryptographic security at a smaller size. For example:
ssh-keygen -t ed25519RSA remains more broadly compatible with legacy servers.
Press Enter to accept the default file location. You can choose a short passphrase—e.g., 2–3 letters or digits—or leave it empty (not recommended).
Once the key pair is generated, you can view the public key with:
cat ~/.ssh/id_rsa.pubNow you need to copy this key to both the proxy server and the main server. Use the following commands:
# copy the SSH key to the proxy server
ssh-copy-id -i ~/.ssh/id_rsa.pub bob@108.177.126.0

# to the main server
ssh-copy-id -i ~/.ssh/id_rsa.pub bob@11.6.3.10
If everything worked correctly, the following command:
ssh 11.6.3.10will prompt only for your short passphrase.
If you frequently connect to servers, you can use ssh-add to have it automatically supply your SSH keys to ssh without prompting for a passphrase. Useful commands:
# keep the key loaded for as long as `ssh-agent` runs
ssh-add

# list loaded keys (agent is active if you see keys)
ssh-add -l

# keep the key in ssh-agent for 8 hours
ssh-add -t 8h
Alternative approach
If you are connected to your office Wi-Fi or corporate VPN, you are most likely inside the network, so the servers are reachable without a proxy. In this case, you can connect directly to the main server and avoid proxy latency.
Here’s an example SSH config setup:
cat ~/.ssh/config

Host 11.6.3.*
  User bob
  ServerAliveInterval 30


cat ~/.ssh/config_proxy

Host 11.6.3.*
  User bob
  ServerAliveInterval 30
  ProxyJump 108.177.126.0
For quick switching, we use a Bash script called con. Create the directory and file ~/username/bash_scripts/con, and add the following content:
#!/bin/bash

server=$1
with_proxy=$2


if [ "$with_proxy" == "" ]; then
    ssh -Y bob@11.6.3.$server -t "bash"
else
    ssh -Y bob@11.6.3.$server -F ~/.ssh/config_proxy -t "bash"
fi
-Y enables X11 forwarding so you can open GUI windows on your local machine, and -t "bash" forces a Bash shell on the server if the default login shell is different.
Now make the script executable so you can run it:
chmod u+x ~/username/bash_scripts/conAdd the script directory to your PATH so that the con command is available everywhere. Open (or create) ~/.bashrc (on macOS, ~/.bash_profile or ~/.zshrc) and add:
export PATH="$PATH:/home/username/bash_scripts/"Now use:
- Inside the network
con 10 You will connect to the host 11.6.3.10
- Outside (through the proxy):
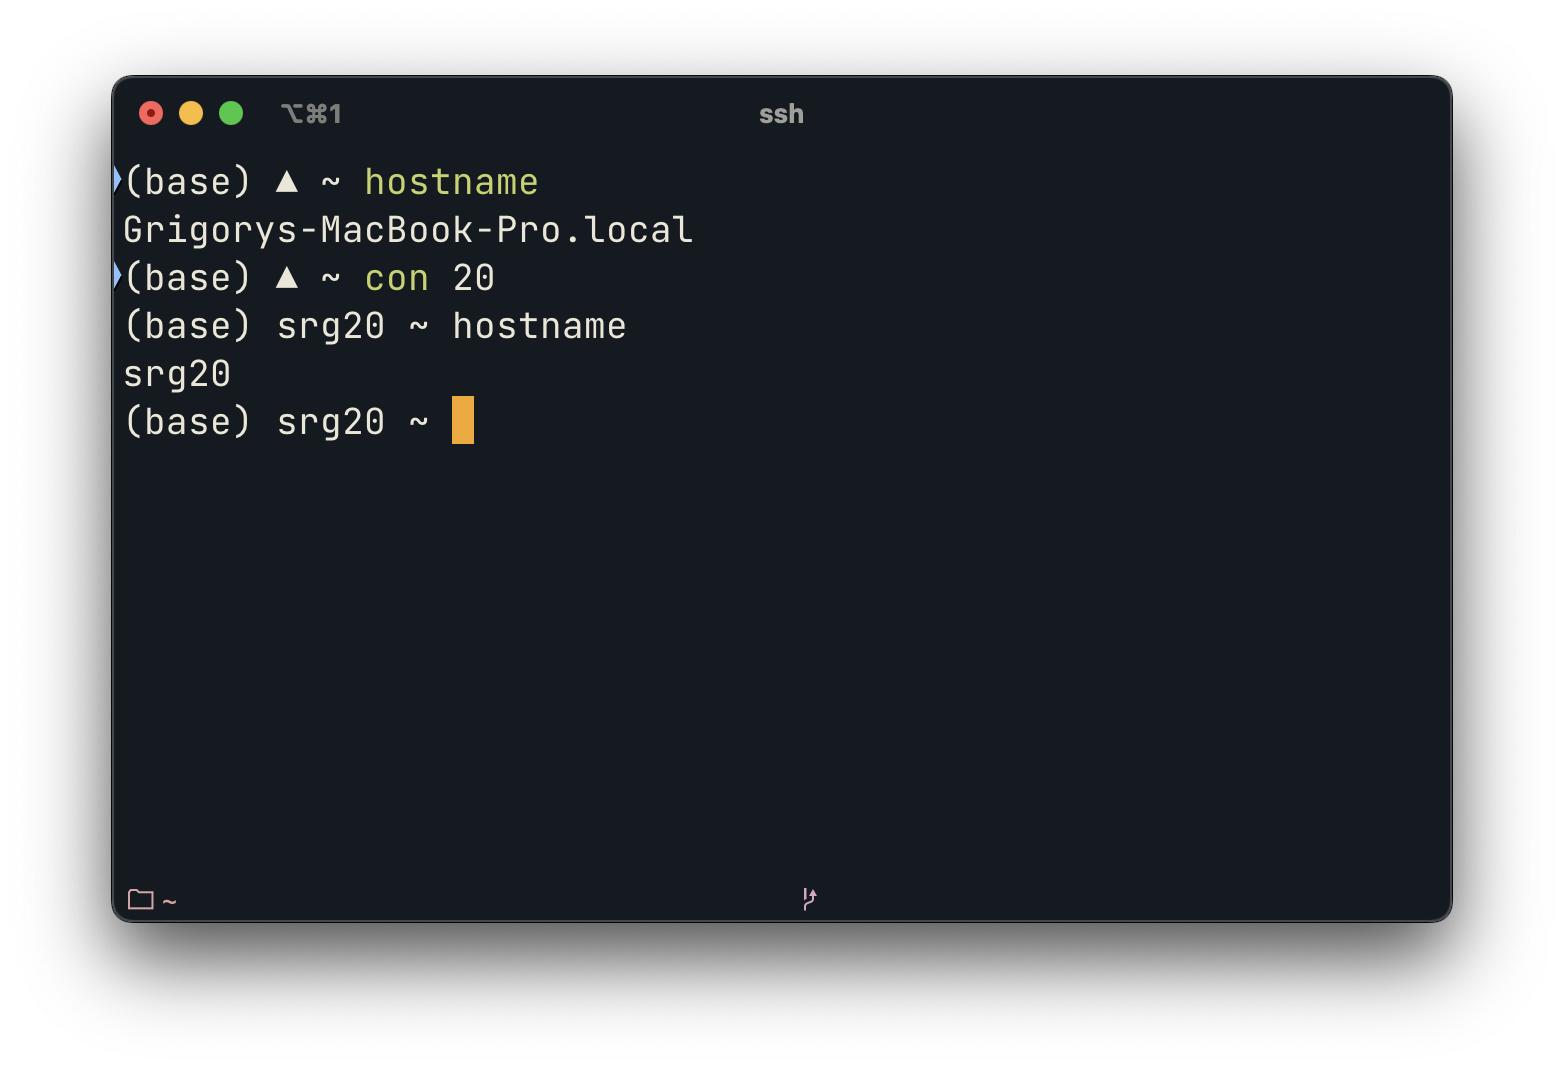
con 10 anysymbolThe second argument can be any string—it simply tells the script to use the config_proxy configuration. This makes the command simpler: without an argument → direct connection; with an argument → via the proxy.
Here’s what it looks like for the author:
Conclusion
You now have a basic setup for connecting to the server and managing your sessions with ease. This will allow you to focus on your work rather than the technical details of logging in. The next steps will guide you through setting up a full development and data-analysis environment.
Next part
In Part 2, we will cover installing Python, R, Jupyter Lab, Coder, and finalizing your end-to-end remote workflow.